


Getting a rental property ready for inspection is harder than it sounds. More than 80 percent of renters lose part of their bond due to cleaning issues or overlooked details. Surprising, right? Most people think a quick vacuum and wiping down surfaces will do the trick, but there are steps you probably miss every single time. What actually makes the biggest difference is having a step-by-step approach and ticking off everything from dust hidden on ceiling fans right down to spotless grout.
| Key Point | Explanation |
|---|---|
| 1. Assemble the right cleaning supplies | Collect professional-grade tools suitable for each surface type to ensure efficient and thorough cleaning. |
| 2. Create a room-specific cleaning plan | Develop a detailed checklist to tackle each area methodically, preventing overlooked spots and aiding time management. |
| 3. Declutter personal belongings completely | Remove all personal items to create a clear workspace, allowing for an effective and thorough cleaning process. |
| 4. Use a top-to-bottom cleaning method | Clean high surfaces first to avoid re-contamination, working systematically downward for maximum efficiency. |
| 5. Conduct thorough quality assurance checks | Inspect each area with careful attention to detail, ensuring all surfaces meet professional cleaning standards before finalising. |
Preparing for a comprehensive rental property cleaning requires strategic planning and the right equipment. Before diving into the cleaning process, assembling a complete set of professional-grade cleaning supplies will streamline your efforts and ensure thorough results. Professional cleaning is not just about having tools, but having the right tools for specific surfaces and challenges.
Your cleaning arsenal should include versatile and targeted cleaning solutions suitable for different surfaces you will encounter during property cleaning. Start by collecting microfibre cloths, which are exceptional for dusting and cleaning multiple surfaces without leaving lint or scratches. These cloths work brilliantly on glass, wooden furniture, stainless steel appliances, and delicate surfaces. Pair these with high-quality multipurpose cleaners that can handle various materials without causing damage.
Essential equipment for rental property cleaning includes multiple buckets, a sturdy mop with replaceable heads, extendable dusting tools, and a powerful vacuum cleaner with multiple attachments. A professional vacuum with HEPA filtration will help remove dust, allergens, and microscopic debris from carpets, hard floors, and hard-to-reach corners. Consider investing in specialised tools like grout brushes, window squeegees, and microfibre mop pads to tackle specific cleaning challenges. Learn more about professional cleaning materials that can transform your cleaning approach.
Prepare a comprehensive cleaning kit that includes protective gear such as rubber gloves, safety glasses, and disposable masks. These items protect you from harsh chemicals and potential allergens during the cleaning process. Your cleaning solution collection should feature:
Organise your cleaning supplies in a portable caddy or rolling cart, which allows easy movement between rooms and ensures you have everything within reach. This systematic approach prevents unnecessary interruptions and helps maintain cleaning momentum. By thoroughly preparing your cleaning supplies and equipment beforehand, you set the stage for a methodical, efficient rental property cleaning experience that meets professional standards.
Here is a handy table outlining the essential cleaning supplies and equipment, including their purpose and surface suitability, to guide you in assembling your comprehensive cleaning kit.
| Item | Purpose | Suitable Surfaces |
|---|---|---|
| Microfibre cloths | Dusting and cleaning without scratches | Glass, wood, stainless steel, delicate surfaces |
| Multipurpose cleaner | General cleaning of various materials | Most hard surfaces |
| Mop with replaceable heads | Cleaning floors thoroughly | Tile, hardwood, laminate |
| Buckets | Holding water/cleaning solutions | All cleaning areas |
| Extendable dusting tool | Reaching high corners and fixtures | Ceilings, fans, vents |
| Vacuum cleaner with attachments | Removing dust/allergens from floors/corners | Carpets, hard floors, upholstery |
| Grout brush | Scrubbing between tiles | Tile, bathroom and kitchen surfaces |
| Window squeegee | Streak-free glass cleaning | Windows, mirrors |
| Rubber gloves & safety gear | Personal protection from chemicals/allergens | All cleaning tasks |
| Carpet/upholstery spot remover | Treating stains and spots | Carpets, soft furnishings |
![]()
Developing a systematic cleaning strategy transforms a potentially overwhelming task into a manageable and efficient process. A room-by-room approach ensures no area is overlooked and helps maintain focus and motivation throughout the cleaning journey. This methodical strategy allows you to track progress, allocate appropriate time and resources, and ensure a comprehensive clean that meets rental property standards.
Begin by creating a visual map or checklist of your rental property, dividing spaces into distinct zones such as kitchen, bathrooms, living areas, bedrooms, and external spaces. Each room requires a tailored cleaning approach considering its unique surfaces, fixtures, and potential problem areas. In the kitchen, prioritise appliance cleaning, including the oven, refrigerator, and countertops. Bathrooms demand special attention to sanitisation, focusing on tiles, grout, fixtures, and potential mould-prone areas. Explore our professional cleaning services guide for additional insights into room-specific cleaning techniques.
Prioritise your cleaning sequence strategically by starting with less intensive areas and progressing to more challenging spaces. This approach prevents cross-contamination and helps maintain cleaning momentum. Consider cleaning from top to bottom in each room a fundamental principle. Begin with ceiling corners, light fixtures, and high surfaces, then progress to walls, windows, furniture, and finally floors. This gravity-assisted method ensures dust and debris naturally fall downward, preventing re-cleaning of already cleaned surfaces.
To effectively track and verify your cleaning progress, develop a comprehensive room-specific checklist that includes:
Remember that different surfaces require unique cleaning approaches. Hardwood floors need gentle, moisture-controlled cleaning, while tiles might require grout-specific treatments. Carpet areas demand thorough vacuuming and potential spot treatments. By creating a detailed, room-specific plan, you transform cleaning from a daunting task into a structured, achievable process that ensures your rental property meets the highest cleanliness standards.
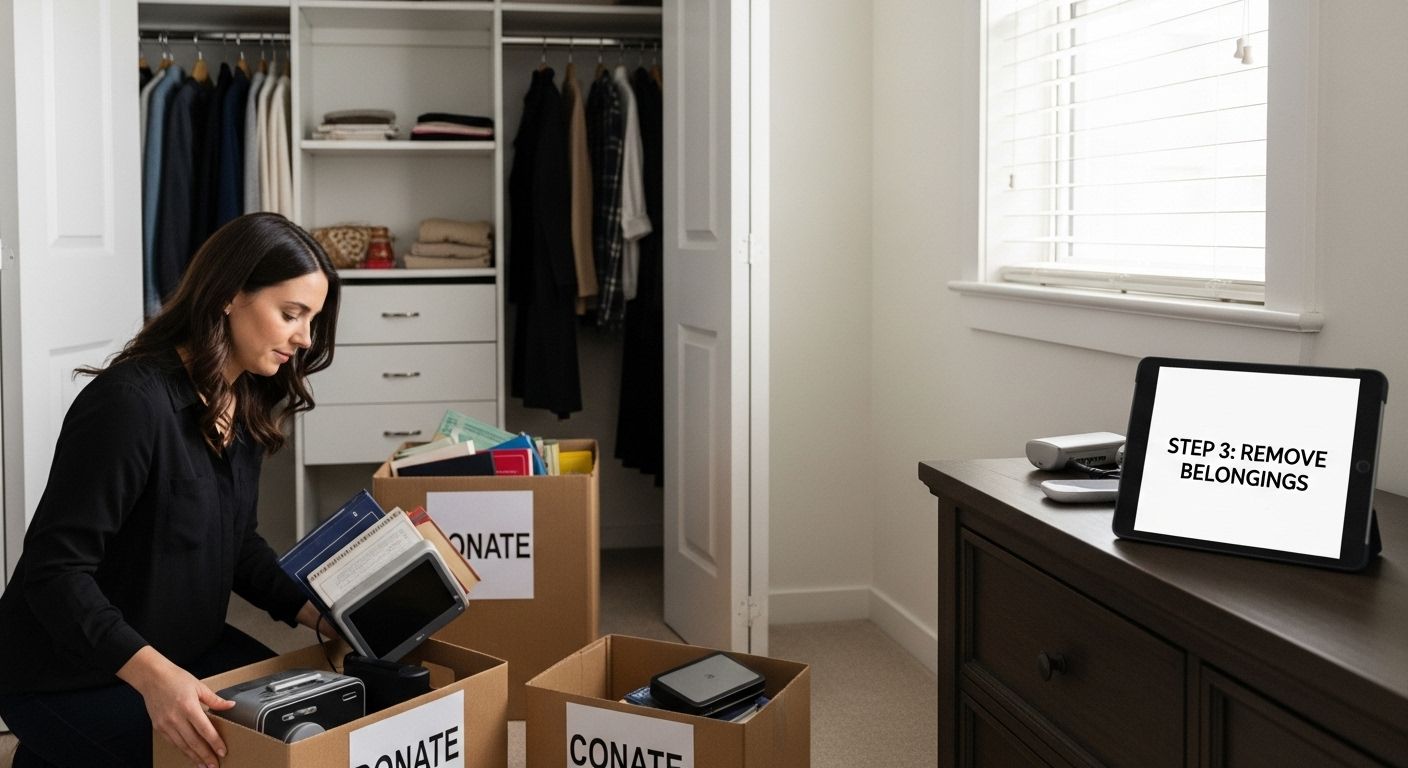
Removing personal belongings and decluttering is a critical preparation step that sets the foundation for a thorough rental property cleaning. This process is not merely about tidying up, but creating a clear workspace that allows for comprehensive and systematic cleaning. Effective decluttering minimises obstacles, reduces potential damage to personal items, and enables a more efficient cleaning approach.
Begin by systematically moving through each room, creating designated sorting areas for items you will keep, donate, discard, or temporarily store. Use large, sturdy boxes or storage containers to categorise belongings, ensuring fragile items are carefully wrapped and protected. Pay special attention to often-overlooked spaces like closets, under-bed storage, kitchen cabinets, and bathroom vanities. These areas tend to accumulate forgotten items that can complicate the cleaning process. Check out our apartment moving tips for seamless organisation to streamline your decluttering strategy.
Tackle personal belongings methodically by starting with less emotionally challenging areas and progressing to more complex spaces. Begin with storage areas, paperwork, and miscellaneous items before moving to more personal spaces like bedrooms and living areas. This approach helps maintain motivation and prevents feeling overwhelmed. Remove all small decorative items, artwork, and personal photographs. Clear surfaces completely to allow for thorough cleaning of shelves, mantels, windowsills, and countertops. Electronics, books, and personal accessories should be carefully packed and removed to enable comprehensive surface cleaning.
Before finalising the decluttering process, conduct a comprehensive room-by-room verification to ensure no personal items remain:
A systematic approach to removing personal belongings transforms your rental property into a blank canvas ready for deep cleaning. By meticulously clearing each space, you create an environment that allows for thorough sanitisation, surface treatment, and preparation for the next occupants. This step is not just about removal, but about setting the stage for a professional-grade cleaning process that meets and exceeds rental property standards.
Below you’ll find a summarised end-of-clean checklist covering room-by-room verification steps to ensure your property is ready for final inspection and meets professional standards.
| Area | Verification Step |
|---|---|
| Drawers & Cabinets | Check interiors/exteriors for remaining items and cleanliness |
| Behind Furniture & Storage | Inspect for hidden belongings and dust |
| Kitchen Appliances | Verify emptiness and cleanliness of appliances |
| Bathroom Cabinets/Vanities | Ensure completely cleared and cleaned |
| Floor Spaces & Corners | Examine for items and accumulated dust/debris |
| Window & Door Frames | Check thoroughly for dust and marks |
| High-Touch Surfaces | Wipe down handles, switches, and controls |
| Flooring & Carpets | Confirm vacuumed/mopped and spotless condition |
Cleaning a rental property requires a strategic, top-to-bottom approach that ensures no surface is overlooked and prevents re-contaminating already cleaned areas. The gravity-assisted cleaning method is fundamental to achieving a comprehensive and efficient cleaning process. By starting at the highest points and systematically working downward, you allow dust, debris, and cleaning residues to naturally settle, making your final floor cleaning more effective.
Begin each room by addressing high surfaces such as ceiling corners, light fixtures, and top shelves using extendable dusting tools with microfibre attachments. These tools help remove cobwebs, dust, and accumulated grime without requiring ladders or risking personal injury. Work your way methodically around the room, paying special attention to often-neglected areas like ceiling fans, air conditioning vents, and the tops of door frames. Discover professional tips for using cleaning agents effectively to enhance your cleaning technique and achieve superior results.
After addressing high surfaces, progress to wall surfaces, windows, and intermediate areas. Use appropriate cleaning solutions for different materials, being careful not to oversaturate painted walls or delicate surfaces. Clean window frames, tracks, and glass using specialised glass cleaner and lint-free cloths. Wipe down picture hooks, electrical outlets, and switch plates, which often accumulate significant dust and grime. Pay particular attention to areas around door handles, light switches, and other frequently touched surfaces that require thorough sanitisation.
Complete your room cleaning by addressing lower surfaces and floors, ensuring a comprehensive bottom-up approach. Verify your cleaning progress using a detailed checklist that confirms each area has been thoroughly addressed:
By adopting a methodical, top-to-bottom cleaning strategy, you transform a potentially overwhelming task into a structured and manageable process. This approach not only ensures a thorough clean but also prevents cross-contamination and redundant cleaning efforts, ultimately saving time and delivering professional-grade results for your rental property.
The final stage of rental property cleaning is a meticulous quality assurance process that separates satisfactory cleaning from exceptional results. Quality assurance is not merely about checking boxes, but ensuring every surface meets professional cleaning standards. This critical step transforms your cleaning efforts from adequate to outstanding, protecting your reputation and increasing the likelihood of receiving your full bond refund.
Begin your quality assurance inspection by using natural and artificial lighting to reveal hidden dirt, dust, and overlooked areas. Daylight and bright indoor lighting will expose subtle imperfections that might have been missed during initial cleaning. Move systematically through each room, using a white microfibre cloth to test surfaces for remaining dust or grime. This technique allows you to see transferred dirt immediately, indicating areas requiring additional attention. Learn more about professional cleaning verification techniques to elevate your cleaning approach.
Photograph each room after cleaning as documentary evidence of your thorough preparation. These images serve multiple purposes: they provide a visual record of the property’s condition, can be used for potential dispute resolution, and offer personal verification of your cleaning standards. Pay special attention to commonly problematic areas such as tile grout, bathroom fixtures, kitchen appliances, window tracks, and baseboards. These zones often accumulate stubborn grime and require focused cleaning and re-examination. Use a critical eye, comparing the current state with the property’s original condition report to ensure you meet or exceed initial expectations.
Complete your quality assurance process by conducting a comprehensive final verification using a detailed checklist:
Your quality assurance inspection is the final guardian of your cleaning excellence. By approaching this step with precision and attention to detail, you transform a standard cleaning into a professional-grade preparation that demonstrates respect for the property and increases the likelihood of a smooth, successful rental transition.
After working through detailed rental cleaning checklists, many face a major challenge – finding the time, motivation and expertise to ensure every corner meets professional expectations. The article highlights common pain points such as managing clutter, preparing cleaning equipment, and the stress of thorough final inspections. These tasks can feel overwhelming, especially when balancing a busy schedule or the pressure to secure your bond refund. At Onyx Removals, we understand the emotional strain that comes with cleaning and moving from your rental property.
Why risk missing critical steps or getting stuck with stubborn stains? Give yourself peace of mind and hand your end-of-lease cleaning to trusted experts. Our team not only delivers spotless, bond-ready cleans but also offers seamless moving, packing, and waste disposal so you can focus on your next chapter. Visit Onyx Removals Melbourne today and see how our comprehensive service range can transform your rental transition. Make your move easy and stress-free by choosing proven professionals. Request your tailored quote now and take the final step toward a successful handover.
You will need items like microfibre cloths, multipurpose cleaners, specific surface cleaners, protective gear, a mop, buckets, a vacuum cleaner with attachments, and specialised tools for areas like grout and windows.
Develop a room-by-room checklist that identifies specific cleaning tasks, required supplies, estimated time for each room, and notes on particular surfaces that may need extra attention. This structured approach helps ensure thorough and efficient cleaning.
Removing personal belongings allows for a clear workspace, minimizing obstacles and preventing potential damage to items. It also facilitates a more comprehensive cleaning process, ensuring that all surfaces are adequately addressed.
Use a top-to-bottom approach, starting with high surfaces like ceiling corners and light fixtures, followed by walls and furniture, finishing with the floors. This method prevents re-contamination and ensures thorough cleaning of all surfaces.
No Related Post


