


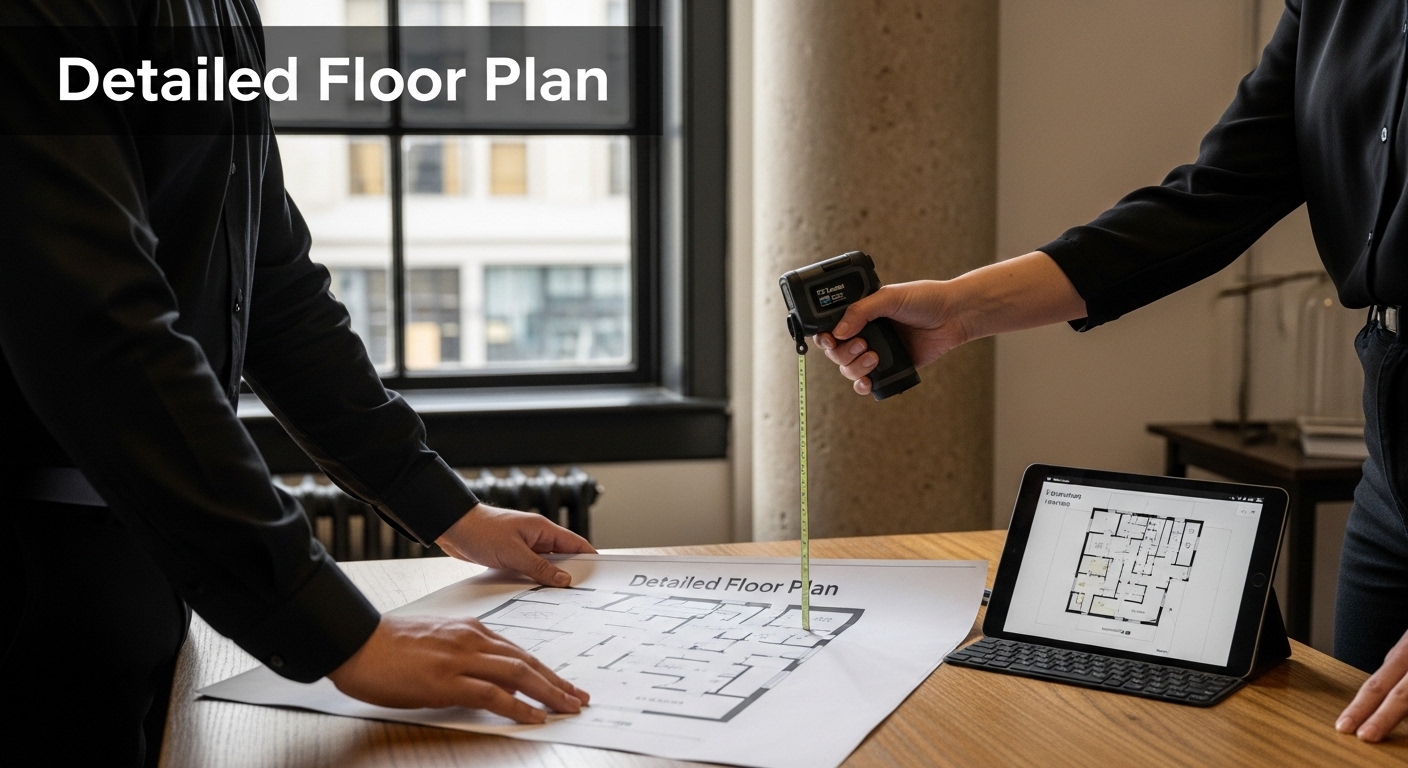
Measuring office space sounds simple. Most would just grab a tape measure and start along the walls. But here’s something most people miss. Using a laser distance meter, you can get measurements that are up to 99 percent accurate, saving you loads of time and headaches. That’s why what really counts is not just measuring fast, but doing it so precisely you know your results stack up every single time.
| Key Point | Explanation |
|---|---|
| 1. Use a laser distance meter | This tool ensures quick, accurate measurements, reducing errors significantly compared to traditional tape measures. |
| 2. Create a scale floor plan | A consistent scale (like 1:100) helps depict all significant details accurately for better spatial understanding. |
| 3. Measure each room meticulously | Record dimensions including height and obstacles to inform future design and space utilization effectively. |
| 4. Record area calculations systematically | Document room dimensions and calculate total space, considering usable versus non-usable areas for planning efficiency. |
| 5. Verify measurements thoroughly | Double-check dimensions using multiple methods and tools to ensure accuracy before finalizing any spatial analysis. |
Preparing to measure office space requires precision and the right equipment. Before diving into measurements, you will need to collect specific tools that will help you capture accurate dimensions efficiently. The goal of this initial step is to ensure you have everything necessary to complete a comprehensive space assessment.

Your primary measuring arsenal should include a laser distance meter, which provides quick and precise measurements without the hassles of traditional tape measures. Professional surveyors and facility managers consistently recommend these digital tools for their accuracy and ease of use. While a standard tape measure can work, a laser distance meter will significantly reduce measurement errors and save considerable time.
In addition to your primary measuring device, you will want to gather several supplementary items to support your office space measurement process. These include:
Before beginning measurements, ensure your laser distance meter has fresh batteries and is calibrated correctly. According to WorkSafe Victoria, accurate measurement is crucial for understanding workspace ergonomics and designing functional office environments.
Prepare a systematic approach by creating a simple floor plan sketch where you will record each measurement. This preliminary step helps you track your progress and ensures no area is overlooked. Consider wearing comfortable clothing and shoes that allow easy movement around the office space, as you might need to navigate between rooms and around furniture.
Verify your measurement tools’s accuracy by performing a quick calibration test on a known distance, such as the width of a standard doorway or desk.
Below is a summary of essential tools and materials needed for accurate office space measurement, including their main purposes for the task.
| Tool/Material | Purpose | Notes or Example Usage |
|---|---|---|
| Laser distance meter | Quick, highly accurate measurements | Ideal for most office measurement |
| Tape measure | Support tool for complex or small areas | Useful for irregular shapes |
| Digital notepad/clipboard | Recording and organising measurements | Can use apps for digital records |
| Graph paper/floor plan software | Creating and updating floor plan sketches | Ensure consistent drawing scale |
| Camera/smartphone | Documenting space visually | Useful for reference and validation |
| Measuring wheel | Measuring larger open areas | Helps cover distances tape may not |
| Fresh batteries | Reliable operation of electronic tools | Always check before starting work |
| This practice helps confirm your equipment is functioning correctly and provides confidence in the measurements you will soon capture. With your tools assembled and your approach planned, you are now ready to move forward with precise office space measurement. |
Creating a detailed floor plan is the cornerstone of accurate office space measurement. This critical step transforms your raw measurements into a comprehensive visual representation of the workspace, enabling precise analysis and future planning. Your floor plan will serve as a strategic blueprint that captures every nuance of the office environment.
Begin by selecting an appropriate scale for your drawing. Most professional floor plans use a scale of 1:100, which means every centimetre on your plan represents one metre in actual space. Consistency is key when establishing your scale, so choose a ratio that allows you to capture all significant details without overwhelming the document with complexity.
Start your floor plan by drawing the exterior walls, paying meticulous attention to their exact dimensions and angles. Use your laser distance meter to capture precise measurements, transferring each measurement carefully onto your graph paper or digital floor plan software. Include critical architectural elements such as windows, doors, electrical outlets, and structural pillars. These details are not merely decorative but provide essential context for understanding the space’s functional layout.
Your floor plan should comprehensively document various workspace characteristics:
According to WorkSafe Victoria, a well-designed floor plan considers not just measurements but also the ergonomic flow of the workspace. This means thinking beyond mere numbers and considering how people will actually move and work within the environment.
As you develop your floor plan, use different colours or shading to distinguish between existing and proposed configurations. This visual differentiation helps stakeholders understand potential modifications and space utilization strategies. Take multiple photographs of the space to complement your floor plan, providing additional reference points for future analysis.
Verify your floor plan’s accuracy by cross-referencing your measurements with physical walkthrough observations. Check that doors open without obstruction, windows align correctly, and the scaled representation matches the physical space. A meticulously crafted floor plan becomes an invaluable tool for office design, renovation planning, and maximizing spatial efficiency.
Measuring each room with precision transforms your preliminary sketches into an accurate representation of office space. This critical step requires methodical attention to detail and a systematic approach that captures every square metre of your workspace. Your goal is to document dimensions that will inform future design, renovation, or relocation strategies.
Begin by selecting the most appropriate measuring technique for each room’s unique characteristics. Laser distance meters excel in open spaces with clear lines of sight, providing instant digital measurements with minimal effort. For more complex areas with irregular shapes or numerous obstacles, a combination of laser measurement and traditional tape measure will yield the most comprehensive results.
Start your measurements from a consistent reference point in each room, typically a corner near the entrance. Measure the length and width of the room, taking care to record measurements in both metres and centimetres. Pay special attention to architectural nuances such as alcoves, built-in fixtures, and structural elements that might impact usable space. These details can significantly affect space utilization and future office design.
Your measurement process should capture critical spatial information:
According to Commercial Building Disclosure Program, precise measurement involves more than just recording basic dimensions. It requires understanding how each space can be effectively utilized for administrative, professional, or collaborative purposes.
Measure multiple times to confirm accuracy, comparing results between different measurement methods. If using a laser distance meter and tape measure, any significant discrepancies should prompt a careful re-examination. Take photographs of each room alongside your measurements, creating a visual record that complements your numerical data.
Complete your room measurements by cross-referencing your recorded dimensions with your initial floor plan. Verify that each measurement aligns with your previous sketches, making adjustments as necessary. A thorough approach ensures that your office space measurement process delivers reliable, actionable information for future planning and optimization.
Recording measurements and calculating total area represents the pivotal moment where your meticulous measurements transform into actionable spatial intelligence. This step bridges the gap between raw data collection and strategic office space understanding, translating dimensional information into precise square metre calculations that will inform critical business decisions.
Organizational precision becomes paramount during this phase. Create a dedicated spreadsheet or measurement log where you will systematically record each room’s dimensions. Start by listing each room separately, documenting length, width, and ceiling height. Calculate the area for each individual space by multiplying length by width, ensuring you record measurements in consistent units typically square metres.
While calculating total area, consider more than just basic dimensional mathematics. Usable space differs from total measured area, so factor in structural elements like support pillars, built-in fixtures, and wall thickness that might reduce functional workspace. Professional surveyors recommend subtracting these structural impediments from your gross measurements to determine net usable area.
Your calculation process should encompass several critical components:
According to the Commercial Building Disclosure Program, accurate area measurement involves understanding not just physical dimensions but potential functional configurations. This means looking beyond simple square metre calculations and considering how space can be optimally utilized.
Double-check your calculations using multiple methods. Compare digital laser measurements with manual tape measure recordings, and cross-reference your spreadsheet calculations. Create a visual representation of your measurements, perhaps colour-coding different areas to highlight their specific characteristics or potential uses.
Finalize your area calculations by preparing a comprehensive summary document. This document should include total square meterage, individual room dimensions, usable space percentages, and any notable spatial characteristics. By transforming raw measurements into a structured, professional report, you create a valuable resource for future office planning, redesign, or relocation strategies.
Verifying measurements represents the crucial final checkpoint in your office space measurement process. This step transforms your collected data from potentially unreliable figures into a reliable, professional documentation set. Precision matters most when confirming the accuracy of your spatial calculations, ensuring that every centimetre is accounted for with scientific rigor.
Begin your verification process by implementing a systematic cross-referencing method. Compare measurements taken with different tools side by side, looking for any discrepancies that might indicate measurement errors. Your laser distance meter readings should align closely with traditional tape measure recordings. Significant variations demand immediate re-measurement and careful investigation of potential sources of error.
Develop a comprehensive verification strategy that goes beyond simple numerical comparison. Walk through each measured space physically, using your floor plan and measurement records as a guide. Check that doors, windows, and structural elements match your documented dimensions precisely. Pay special attention to areas with complex geometries or potential measurement challenges, such as rooms with irregular shapes or multiple architectural features.
Your verification checklist should encompass several critical elements:
According to the Commercial Building Disclosure Program, accurate measurement involves more than just recording numbers. It requires a holistic approach that considers the functional potential of each measured space.
Utilize digital tools to enhance your verification process. Create overlays of your measured floor plan on original architectural drawings, checking for precise alignment. Take high-resolution photographs of each room, using these visual references to double-check your recorded measurements. If possible, invite a second person to independently verify your measurements, providing an additional layer of quality control.
Complete your verification by preparing a final report that highlights your measurement methodology, tools used, and any challenges encountered during the process. Document any minor discrepancies and explain how they were resolved.
This table summarises the main verification steps for ensuring the accuracy of your office space measurements, highlighting the key actions and expected outcomes.
| Verification Step | Action Required | Desired Outcome |
|---|---|---|
| Cross-reference tools | Compare digital and manual measurements | Identify and resolve discrepancies |
| Physical validation | Walk through space, check dimensions | Measurements match physical reality |
| Check for consistency | Review measurements across tools | Consistent values for all dimensions |
| Investigate discrepancies | Re-measure and verify unusual results | All issues confirmed or corrected |
| Confirm with initial floor plan | Align recorded data with sketches | No major deviations |
| Digital overlays/photographs | Overlay plans or reference images | Enhanced measurement confidence |
| Second-person verification (if possible) | Get another person to check | Additional quality assurance |
| This comprehensive approach transforms your measurement exercise from a simple data collection task into a professional, reliable spatial analysis that can inform critical business decisions about office space utilization. |
You have just learned how precision and accuracy can make or break an office relocation. Yet, turning those thorough office space measurements into a seamless move is often where the real challenge begins. Errors in measuring can lead to wasted time, disrupted workflows, and costly mistakes during your office transition. You need a trusted partner who can translate your detailed floor plans and room measurements into a well-coordinated, hassle-free move. With Onyx Removals, you gain a team that values accuracy and professionalism as highly as you do.
Stop worrying about overlooked dimensions or last-minute surprises. Visit Onyx Removals Melbourne and discover how our experienced team can interpret your measurements, create personalized moving plans, and handle every detail so your business can stay focused on what matters most. Get a quote today and ensure all that careful measuring results in your smoothest office move yet.
To accurately measure office space, use a laser distance meter for precise measurements, and supplement it with a tape measure for complex areas. Be systematic in your approach, recording dimensions in a notepad or using digital floor plan software.
Essential tools include a laser distance meter, a tape measure, a digital notepad or clipboard, graph paper or floor plan software, a camera for documentation, and a measuring wheel for larger areas. Ensure your tools are calibrated before starting.
Record measurements systematically in a dedicated spreadsheet or measurement log, documenting each room’s dimensions, including length, width, and ceiling height. Calculate the area by multiplying length and width, and factor in any non-usable space.
Verifying measurements is crucial to ensure accuracy. Cross-reference data collected with different tools and physically check recorded dimensions against the actual space. This process helps identify any discrepancies that could impact design or function.
No Related Post


